
DLS 2024 - RedTeam Fails - "Oops my bad I ruined the operation"
Red Team Fails - “Oops my bad I ruined the operation”, a story on how to fail a red team assessment.
TLDR: Recently I had the pleasure to give a rump during the “Drink Love Share” meet organized by TheLaluka. This blog post will delve deeper into the topic.

This rump told the tale of a little Dino starting in the red team industries.
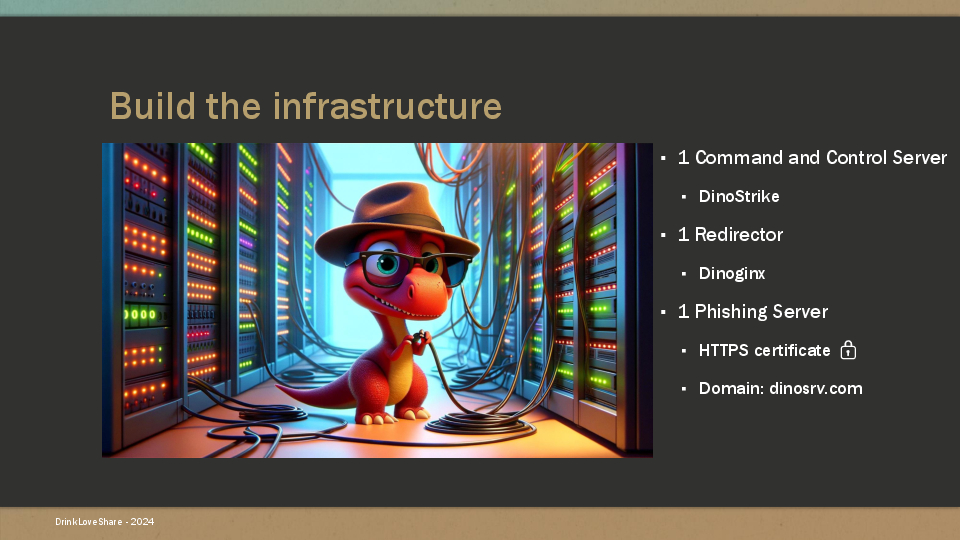
Our Dino started his assessment like everybody by provisioning several servers, at least one C2, Redirector, Phishing. He also bought a domain “dinosrv.com and requested some HTTPS certificate for its infrastructure because he likes to have 🔒 on his phishing pages.
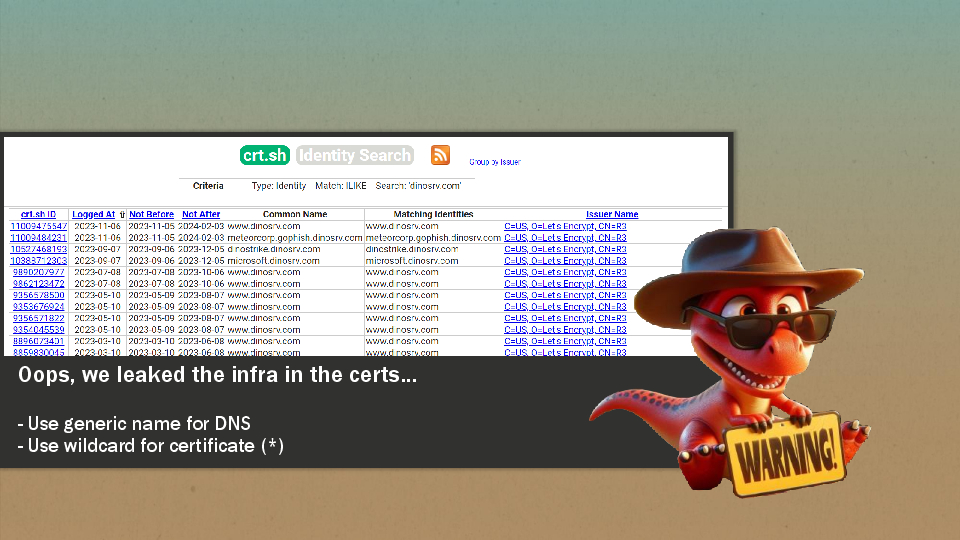
But he already did some mistakes and requested certificates for the whole infrastructure using Let’s Encrypt. And by doing so, he leaked the C2 server “dinostrike.dinosrv.com”, the phishing infrastructure “meteorcorp.gophish.dinosrv.com” and more importantly he also used the client name in the subdomain “microsoft.dinosrv.com”.
Many companies will have proactive phishing detections in place which can query the Certificate Transparency for specific keywords linked to them. You can try it yourself by clicking the “OPEN THE FIRE HOSE” button on certstream.calidog.io.
As a general guideline, it is highly recommended to avoid any links or references to the targeted company. You can also limit the certificate exposure by requesting a “wildcard” certificate: *.dinosrv.com.
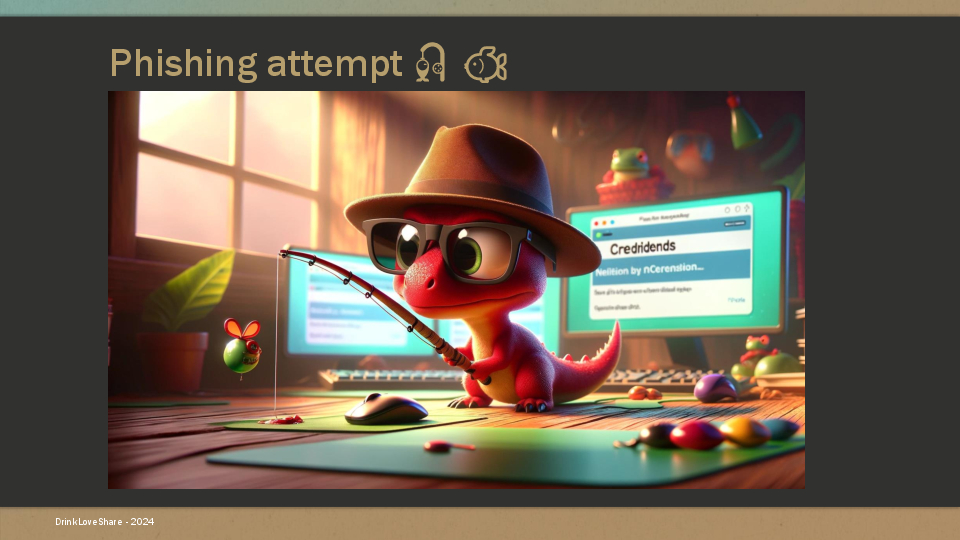
However our little dino didn’t care about those mistakes and continued its phishing deployment. He installed and configured a basic Gophish instance. And that is his second critical mistake.
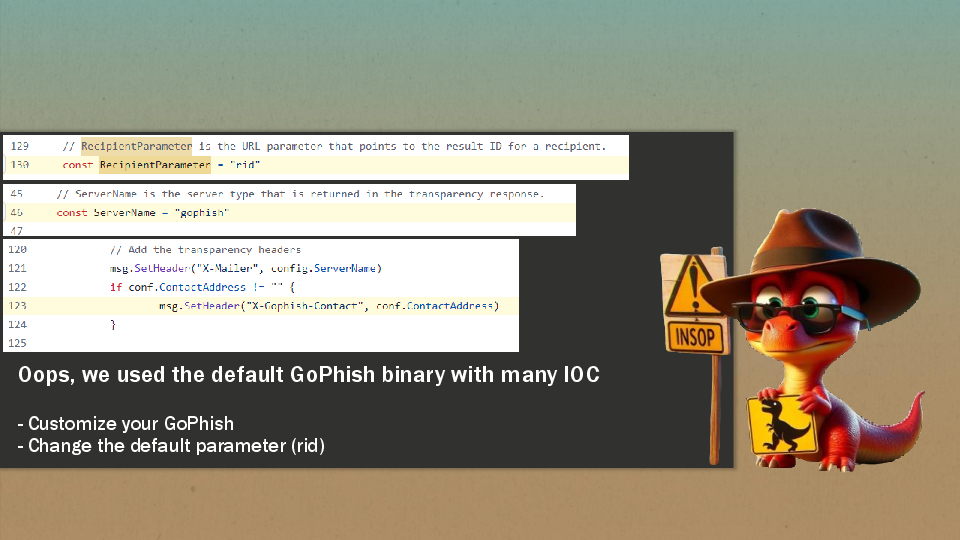
By default Gophish comes with pre-configured indicators of compromise (IOC):
- Every email sent will contain a phishing with a
ridparameter to identify the target: campaign.go#L130 - The default server name used in the transparency response is
gophish: config.go#L46 e.g:msg.SetHeader("X-Mailer", config.ServerName) - Finally you also send the
X-Gophish-Contactheader indicating your email and that you are using Gophish: email_request.go#L123
As a general guideline you should always check the source code for potential detection sinks and backdoors. It is not always a good idea to use the easiest click and deploy method, take some time to review and test your infrastructure.
Also, the IOC mentionned in this blogpost can appear in several in the Gophish source code, don’t forget to find and delete them all 😉.
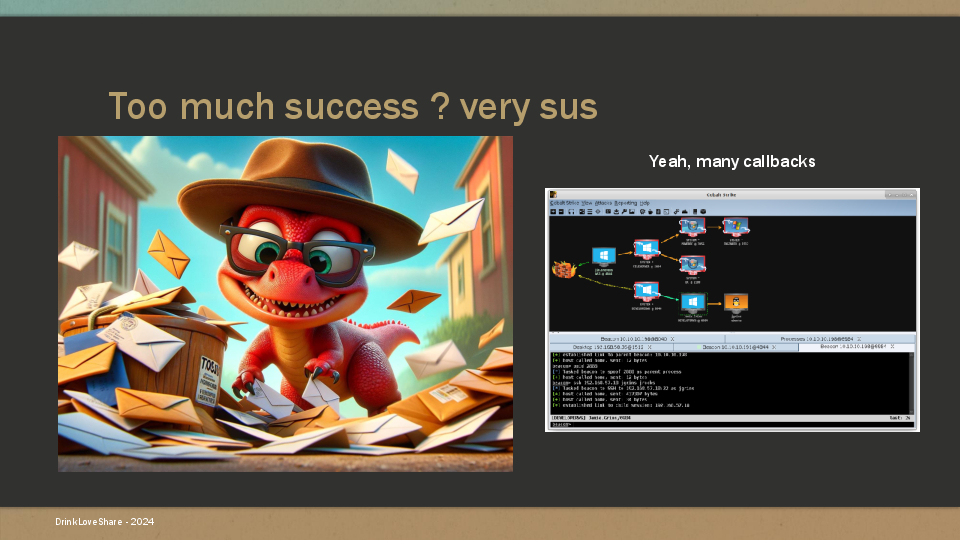
Our little dino sent the phishing emails with his fresh infrastructure and started to get some shells back. For the story sake, we won’t focus on how the beacons were generated and why customers clicked on the binary. Let’s say they are very willing to be compromised.
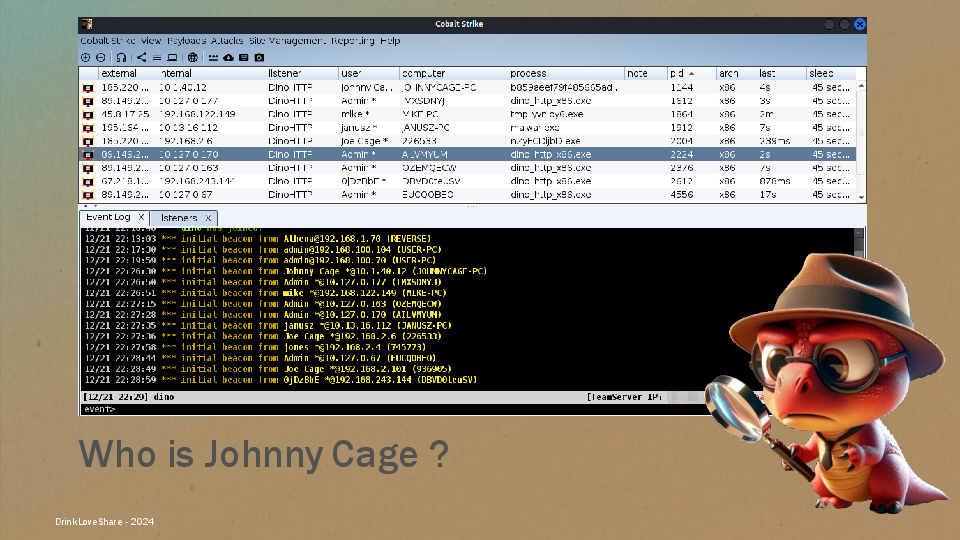
Yay a lot of shell sessions came back to our C2 infrastructure, little dino is quite happy, but something smells fishy. Why is there so many different machines, who is Johnny Cage and why the process is malwar.exe ? Also why does the beacon die after 10 seconds and a new one appear ?
After investigating, our little dino came to the conclusion: someone is sharing the binary and he is starting to get shells outside of the targeted organization.
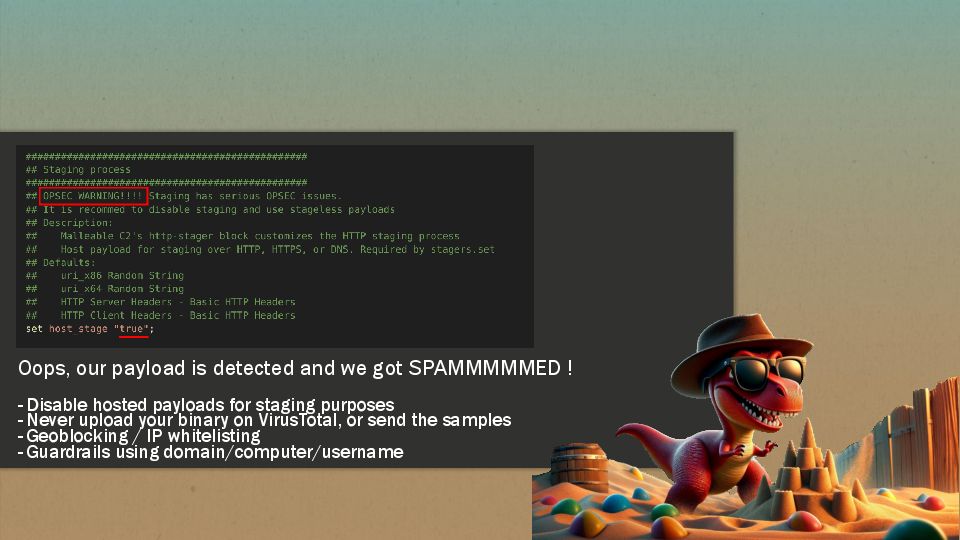
In fact, many mistakes and misconfigurations were done. For starter, the host staging feature was enabled in his Command and Control server. This allows the beacon to request the second part of the payload from the server, while it seems to be a nice feature to send a small binary without too much detections, this is also a way for investigators to get the second part of the shellcode. More details on how to extract the full shellcode here: Cobalt Strike Staging and Extracting Configuration Information - @FranticTyping
In a nutshell, you can generate a valid checksum8 URI to get the shellcode using this Python code.
import rstr

def generate_checksum8_uri(arch):
    value = 0
    while value != arch:
        rand = rstr.xeger(r'[A-Za-z0-9]{4}')
        value = (sum([ord(ch) for ch in rand]) % 0x100)
    return "/" + str(rand)

x64_uri = generate_checksum8_uri(93)
print("Generated x64 URI: %s" %(x64_uri))
Here are some common errors that can ruin your op:
- Uploading your payload on VirusTotal or letting the antivirus send the samples from your Virtual Machines
- Allowing anyone to contact your infrastructure, at least put some geographical limitation. In a better scenario, you should allow only your Team and Customer IPs.
- Use a redirector, don’t expose your C2 TLS stack to the web. JA3, JA3S and JARM are different fingerprint methods targeting the SSL/TLS layer.
- Don’t use the default configuration of the beacon, either simulate an attacker with a specific configuration or create your own: threatexpress/malleable-c2/jquery-c2.4.9.profile
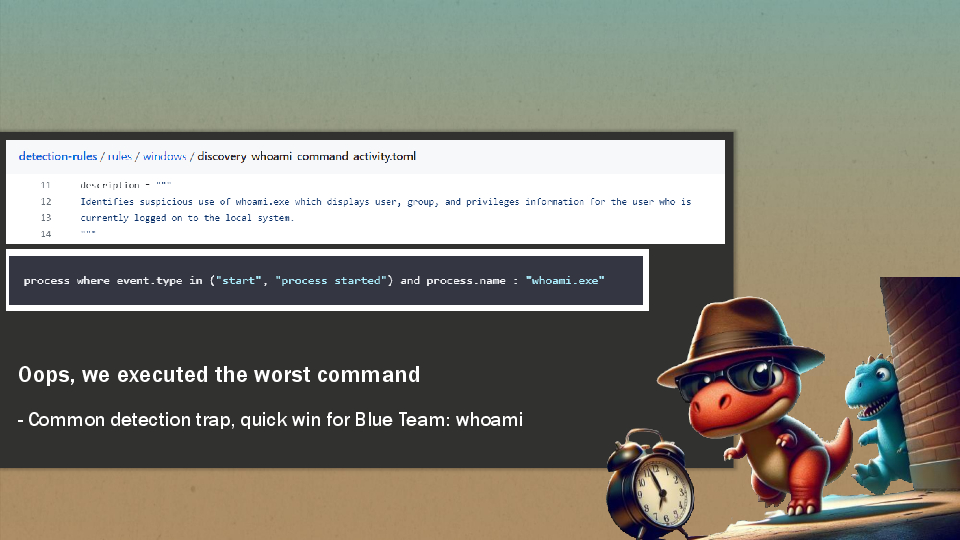
Going back to our story, our little dino executed the command whoami.exe to know the username of the compromised user. However this is worst way to know this information as this is an easily signatured behavior elastic/detection-rules/discovery_whoami_command_activity
Here are some pointers to do it without spawning whoami,
- List your kerberos tickets
- Look for the owner of the process that spawned your beacon
- List your environment variables:
dir env:anddir env:USERNAME - Use a beacon object file (BOF) to bring your own whoami: trustedsec/CS-Situational-Awareness-BOF/whoami
There are other way, just be creative 🦖

Now that we got our initial access, our little dino is going to enumerate the network and the Active Directory.
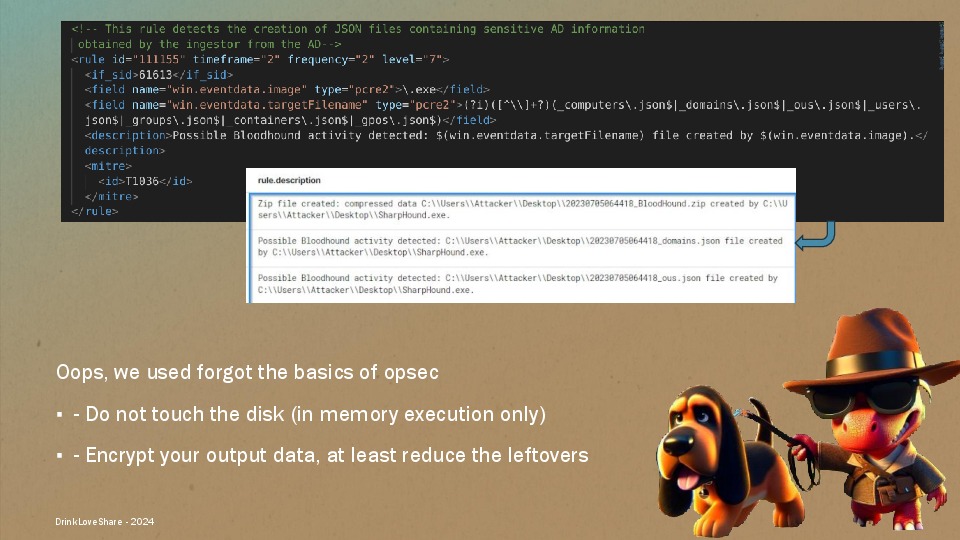
He used the famous BloodHound collector BloodHoundAD/SharpHound, but he should have run it from the memory using the command execute-assembly instead of dropping the binary on the disk.
Also the output of the collector can be detected (output.json, domain.json, etc).

BloodHound indicated that we can use the Kerberoasting attack against several accounts.
Any valid domain user can request a kerberos ticket (ST) for any domain service. Once the ticket is received, password cracking can be done offline on the ticket to attempt to break the password for whatever user the service is running as. - InternalAllTheThings

Armed from the best tools in his arsenal, little dino is running the Kerberoasting module. But this will generate a lot of noises because it doesn’t target a single account by default.
- The LDAP query is using a wildcard to find the service principal name
"(&(servicePrincipalName=*)(UserAccountControl:1.2.840.113556.1.4.803:=512)(!(UserAccountControl:1.2.840.113556.1.4.803:=2))(!(objectCategory=computer)))"- ldap.py. It might pick up honeypot Service Account.
You should also keep in mind the encryption method used for the ticket.
- Kerberos RC4 - Default (Ticket Encryption Type = 0x17)
- AES (Ticket Encryption Type = 0x12)
Finally, our dino managed to crack some hashes and retrieve their password. It is now time to move onto another machines and services.
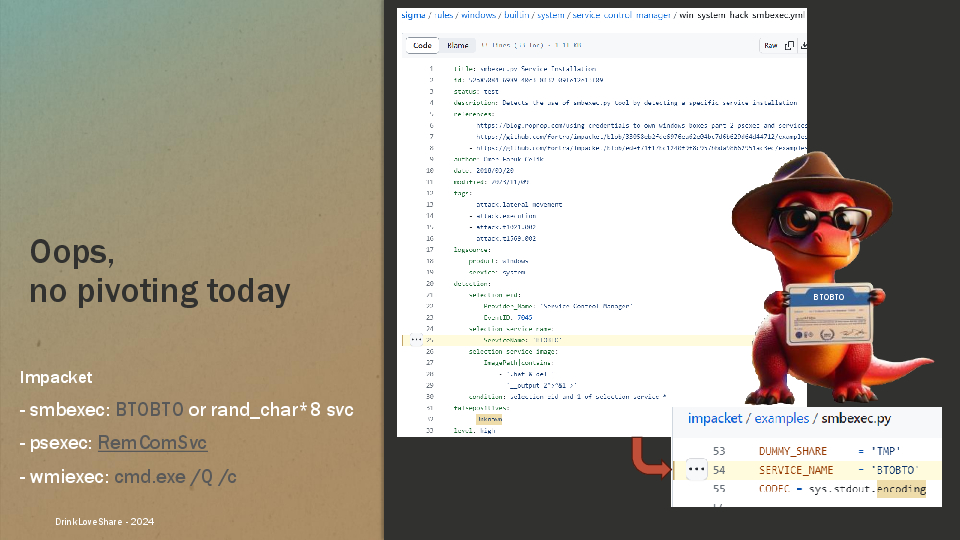
Impacket is a great suite of scripts, but you have to know their behavior before executing them, otherwise you will get caught like our little dino.
Here is some common pitfalls:
smbexec.pyis using a service to execute commands. In the earliest version, it was namedBTOBTObut it has now 8 random characters.psexec.pyis still based on a well known service released on January 2012. 10+ years later, we have a lot of detection based on that kavika13/RemComSvcwmiexec.pyis not better, every command will be prefixed withcmd.exe /Q /c. Ref: wmiexec.py#L127
As a general guideline it is always better to blend in and use the same tools used by infra/dev/internal team, which could be anything: RDP, WinRM/PS Remoting, etc.
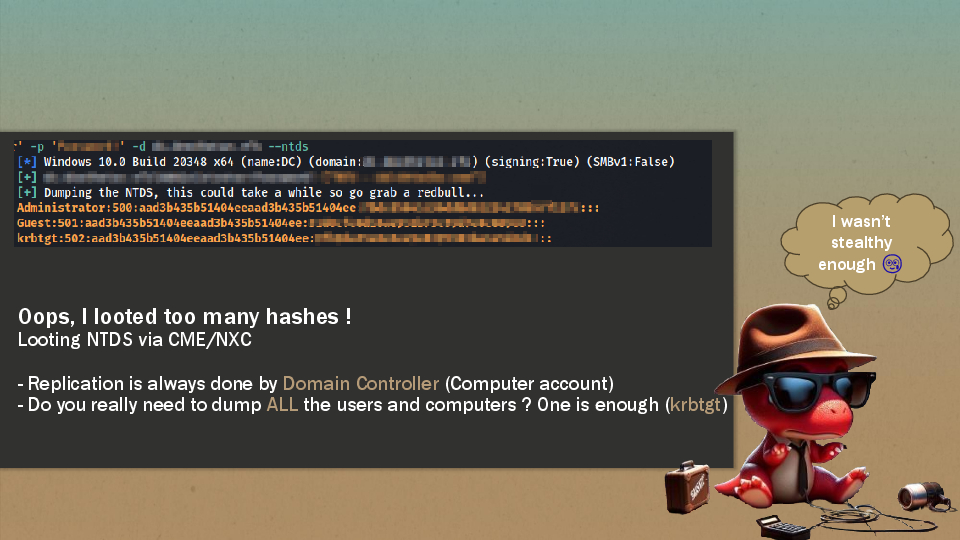
After some long pivoting sessions, it was time for the best dino in town to dump the holy grail: the ntds database.
However, here are some tips to know when doing a DCSync:
- The replication is always done between 2 Domain Controllers which are Machine Accounts. Don’t do it with a user account, remember that you can still create 10 machine accounts if needed. 🍿
- You don’t need to dump the whole database, the account
krbtgtwill grant you every access you need.
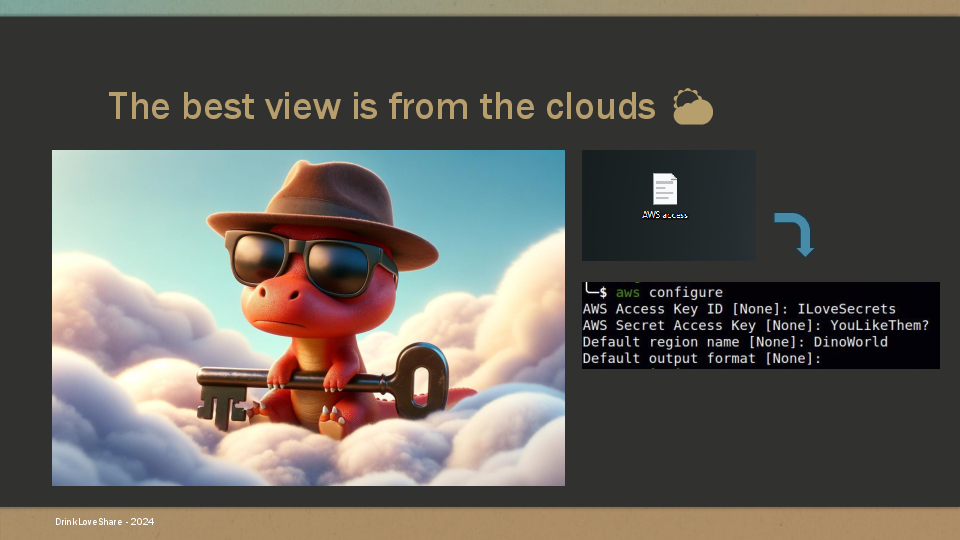
After compromising the entire internal network, our dino couldn’t leave without poking at the cloud. He discovered some credentials in the desktop of an employee.
In theory, he only had to use the credential with the aws cli to connect to the Amazon Web Service API.
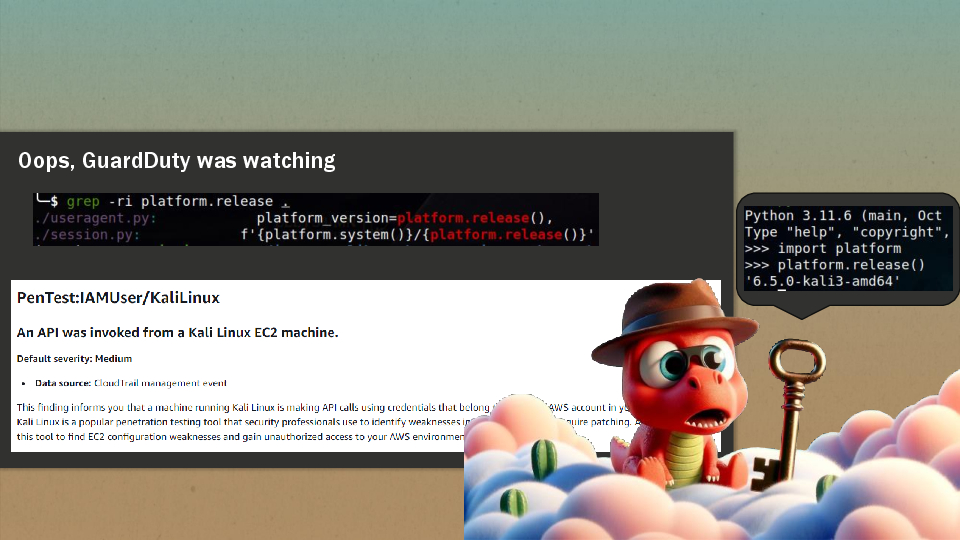
But you shouldn’t do it from a Kali,Parrot or Pentoo machine, because the Boto3 library used by the AWS binary is generating a user-agent based on the platform: 6.5.0-kali3-amd64 in our example. GuardDuty IAM finding types

And it’s Game Over for our dino, he got caught by the Blue Dinos. Next time he will be more stealthy and move like a ninja 🥷
References
- DrinkLoveShare V1 - Rump Session - TheLaluka - 19 janv. 2024
- DrinkLoveShare V1 - Slides DLS24-red-team-fails-dino.pdf
- Never had a bad day phishing. How to set up GoPhish to evade security controls - Nicholas Anastasi - Jun 30, 2021
- Hunting Cobalt Strike Servers - Bank Security - May 12, 2022
- Detecting Kerberoasting Activity Part 2 – Creating a Kerberoast Service Account Honeypot - Sean Metcalf - 08 FEB 2017
- Quick and Dirty CloudTrail Threat Hunting Log Analysis - George Fekkas - Jan 25, 2021